• Category Archives Hyper-V
  • Shrink VHD with PowerShell

    Recently I posted directions on how to manually compact VHD files in Windows 2008 R2 here. In coordination with a fellow Engineer David Ott we have now completed a Powershell Script that will handle this for you automatically. Depending on how you set your parameters this script can even be run as a scheduled task.

    I have created two versions of the script, one for Citrix Provisioning Server (PVS) environments and one for running against specified folders.
     

    Download the script for


    Update – After further testing, I have encountered an issue once while running the script on actively streamed target devices. A reboot resolved the issue. As such I will be making modifications to the script soon.

    In limited testing this script has been run on VHDs in both standard and private mode with devices streamed from Citrix Provisioning Server with no apperant impact. I have also run IOmeter while shrinking the vDisk and there was no difference in IOmeter results while disks were compacting vs disks that were not. I also performed some End User Experience testing for latency and found no impact to actively streamed devices.

    I still cannot recommend running the script in a production environment on actively streamed devices without substantial testing in your environment, as always with any script, test test and test some more and decide on how the impact to your environment.

    Reasons for the script

    Dynamic Virtual Hard Disks (VHDs) can grow to a maximum size to accommodate data as required. As data is added to the VHD, the VHD file size grows. When data is deleted from the VHD, the VHD size does not decrease. The VHD size remains at the largest amount of data stored within the VHD. Compacting a VHD reduces the VHD file size to match the amount of data stored within the VHD, therefore accurately representing the true amount of data within the VHD.

    • Optimize dynamic VHD file sizes to only use what you actually need as deleted files are not cleared from the VHD even though Storage grows on trees
    • Reduce Boot times, smaller VHD files boot faster  

    The script as written below will do the following.

    1. Add Citrix PVS Powershell Snap In
    2. Create Function to store PVS data in an object, special thanks to @CarlWebster on his PVS Documentation post that detailed how to gather and use this information
    3. Variables for PVS function to gather Store Data *** In Non_PVS script, step 1/2 are commented out
    4. Options to hard code a path in script or prompt the user to enter a path
    5. The next part will find the next available drive letter on the system and use that for the script, options are there to manually set or prompt the user as well
    6. Here is where the fun starts and begins to run DiskPart with gathered information. The process below will loop through all VHD files located in $path
      1. Attach VHD
      2. Assign $letter to attached VHD on partition 1
      3. Defragment the drive
      4. Detach VHD
      5. Attach Disk read only
      6. Compact the VHD
      7. Detach VHD

    The Script

    ##########################################################################
    # Shink VHD Files
    # This script is designed to shrink Dynamic VHD files used by products such as Citrix Provisioning Server
    # XenApp_Wizard_v1.ps1 script written by Phillip Jones and David Ott
    # Version 1.0
    # This script is provided as-is, no warrenty is provided or implied.
    #
    # The author is NOT responsible for any damages or data loss that may occur
    # through the use of this script.  Always test, test, test before
    # rolling anything into a production environment.
    #
    # This script is free to use for both personal and business use, however,
    # it may not be sold or included as part of a package that is for sale.
    #
    # A Service Provider may include this script as part of their service
    # offering/best practices provided they only charge for their time
    # to implement and support.
    #
    # For distribution and updates go to: http://www.www.p2vme.com
    ##########################################################################

    # Please uncomment this entire section if using Citrix Provisioning Services to detect and use store path

    Add-PSSnapin mclipssnapin
    Function BuildPVSObject
    {
        Param( [string]$MCLIGetWhat = ”, [string]$MCLIGetParameters = ”, [string]$TextForErrorMsg = ” )

        $error.Clear()

        If($MCLIGetParameters -ne ”)
        {
            $MCLIGetResult = Mcli-Get “$($MCLIGetWhat)” -p “$($MCLIGetParameters)”
        }
        Else
        {
            $MCLIGetResult = Mcli-Get “$($MCLIGetWhat)”
        }
        If( $error.Count -eq 0 )
        {
            $PluralObject = @()
            $SingleObject = $null
            foreach( $record in $MCLIGetResult )
            {
                If($record.length -gt 5 -and $record.substring(0,6) -eq “Record”)
                {
                    If($SingleObject -ne $null)
                    {
                        $PluralObject += $SingleObject
                    }
                    $SingleObject = new-object System.Object
                }

                $index = $record.IndexOf( ‘:’ )
                if( $index –gt 0 )
                {
                    $property = $record.SubString( 0, $index  )
                    $value    = $record.SubString( $index + 2 )
                    If($property -ne “Executing”)
                    {
                        Add-Member –inputObject $SingleObject –MemberType NoteProperty –Name $property –Value $value
                    }
                }
            }
            $PluralObject += $SingleObject
            Return $PluralObject
        }
        Else
        {
            line 0 “$($TextForErrorMsg) could not be retrieved”
            line 0 “Error returned is ” $error[0].FullyQualifiedErrorId.Split(‘,’)[0].Trim()
        }
    }
     $GetWhat = “store”
     $GetParam = “”
     $ErrorTxt = “Store Information”
     $Store = BuildPVSObject $GetWhat $GetParam $ErrorTxt
     # Path to VHD files is hard coded below
     $path = $store.path

    # Hard coded path *** Please edit and uncomment line below to set hard coded path, ex. if you want to schedule task
    # $path = “c:”

    # Please uncomment line below if you would like for the script to ask you which drive you want to use.
    # $path = Read-Host “Please enter where your VHD ‘Virtual Hard Drives’ are stored”

    # Hard coded letter *** please edit and uncomment line below if you would like to use a hard coded path
    # $letter = Read-Host “Please enter an available drive letter, format ex c: or d: not c:”

    # The lines below will detect the next legal available drive letter and choose the next available letter 
    $letter = [char[]]”DEFGJKLMNOPQRTUVWXY” | ?{!(gdr $_ -ea ‘SilentlyContinue’)} | select -f 1
    $letter = $letter + “:”

    # This is where the script will collect all vhd files in the specified folder and compact them
    $Dir = get-childitem $Path -include *.vhd -name

    foreach ($name in $dir) {
    $vdiskpath = $path + “” + $name
    $script1 = “select vdisk file=`”$vdiskpath`”`r`nattach vdisk”
    $script2 = “select vdisk file=`”$vdiskpath`”`r`nselect part 1`”`r`nassign letter=$letter”
    $script3 = “select vdisk file=`”$vdiskpath`”`r`ndetach vdisk”
    $script4 = “select vdisk file=`”$vdiskpath`”`r`nattach vdisk readonly`”`r`ncompact vdisk”
    $script1 | diskpart
    start-sleep -s 5
    $script2 | diskpart
    cmd /c defrag $letter /U
    $script3 | diskpart
    $script4 | diskpart
    $script3 | diskpart
    }

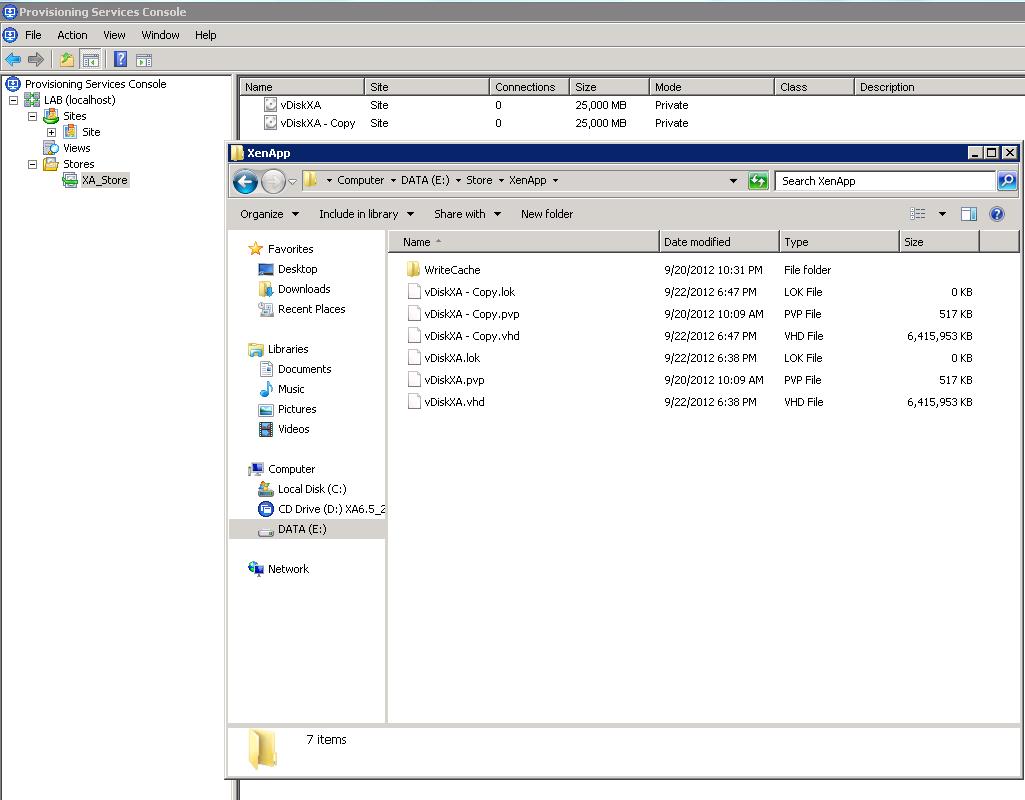
    In the screenshot you will see two VHD files located in a PVS store. Both are the same size on disk currently, one has had some files deleted by mounting the VHD manually and the space is not cleared from the VHD yet…

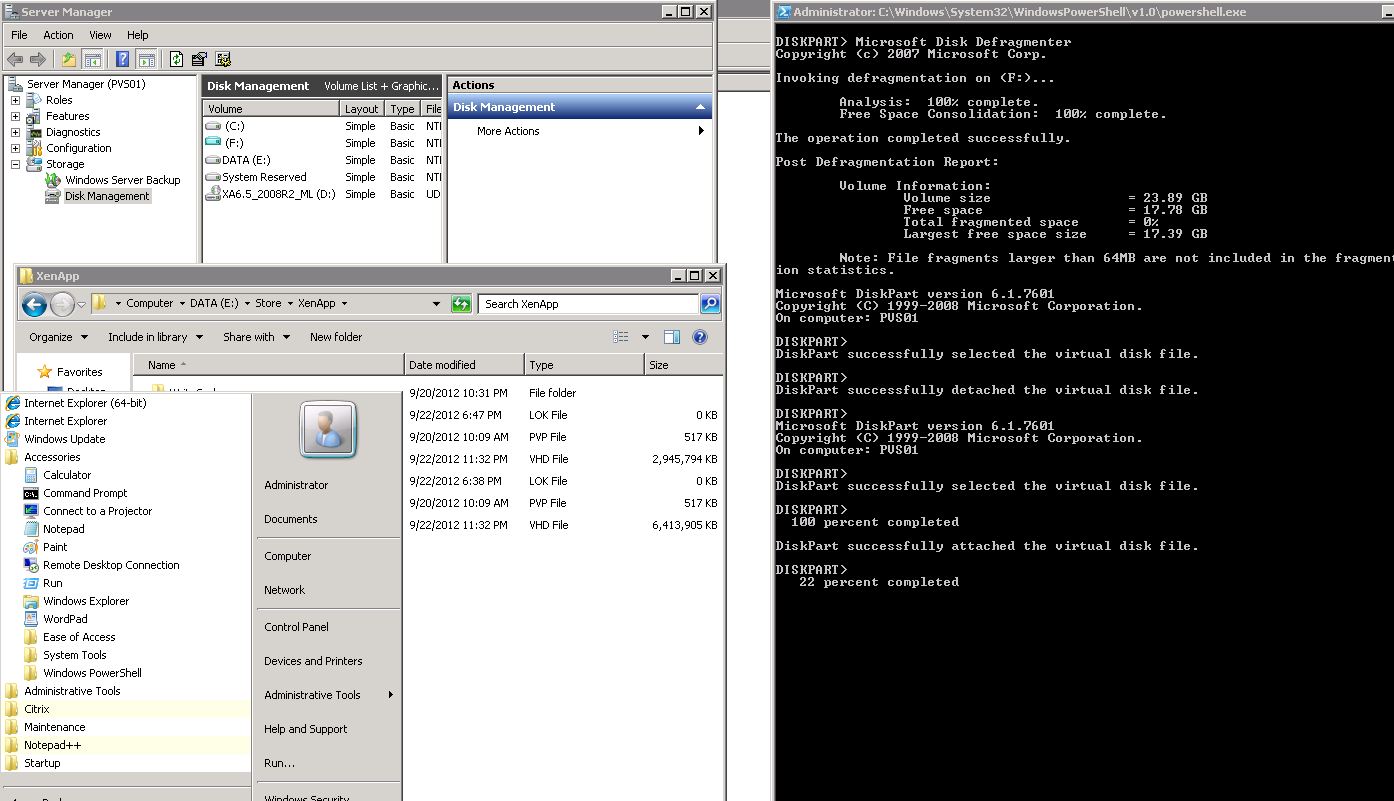
    The below screenshot is after the script is completed and the VHD has been compacted.

    Hope you enjoy and find this script useful, if you have suggestions, comments or issues or anything, leave me a comment below or find me on twitter at @P2Vme


  • Home Lab – a great resource

    I have been looking at building a lab for quite some time, years actually.

    Well I finally pulled the trigger, which I couldn’t do without the support of my company Varrow and my wife. Check out Jason Nash’s blog post on “In Support of the Home Lab” on how Varrow really takes it to the next level for supporting home labs and I think other companies should step up and help their employees too as the lab is a win/win situation for all parties involved.

    Read more for details on equipment and some of the trials and tribulations I have gone through thus far.


    There are many blog posts from folks in the community on building a home lab and what equipment they chose. I will include some of those articles at the end to give you more ideas on what to use in your lab.

    Here is the equipment that I chose, all purchased from Newegg.

    Case LIAN LI PC-V351B Black Aluminum MicroATX Desktop Computer
    2
    $109.99
    $219.98
    Motherboard SUPERMICRO MBD-X9SCL-F-O LGA 1155 Intel C202 Micro ATX
    2
    $179.99
    $359.98
    Power Supply Rosewill Green Series RG630-S12 630W Continuous @40°C,80
    2
    $59.99
    $119.98
    CPU Intel Xeon E3-1220 Sandy Bridge 3.1GHz LGA 1155 80W
    2
    $209.99
    $419.98
    Memory Kingston 8GB 240-Pin DDR3 SDRAM DDR3 1333 ECC Unbuffered
    4
    $79.99
    $319.96
    SSD – Internal Crucial V4 CT032V4SSD2BAA 2.5″ 32GB SATA II MLC Internal
    2
    $49.99
    $99.98
    NAS Synology DS212 Diskless System DiskStation – Feature-rich 2-bay
    1
    $299.99
    $299.99
    Storage Seagate Barracuda ST3000DM001 3TB 7200 RPM SATA 6.0Gb/s
    2
    $149.99
    $299.98

    All total this configuration cost me $2139.83 which again I couldn’t do without my employers generous lab policies after all I have four boys to feed and a wife who I want to keep happy.

    Notes on why I chose each piece for my lab as I put a lot of thought and planning into it. I had limited space and certain things I wanted to do and a set budget I had to get mine done in. You could choose other parts and save some money as well.

    • Case  – Chose the case due to size mainly and aesthetics, had to pass Wife Acceptance Factor
    • Motherboard – I wanted the Integrated IPMI 2.0 with KVM and Dedicated LAN for remote management
    • Power Supply – The power supply was on sale and got solid reviews for being quiet improving the WAF (wife acceptance factor)
    • CPU – Processor supports VT-D and was the best deal for my money
    • Memory – Best price Unbuffered ECC RAM i could find *Motherboard Requires Unbuffered ECC
    • SSD Internal – Wanted to use the Swap to Host Cache aka Swap to SSD Features in vSphere 5
    • NAS – Synology – accept no substitute -AWESOME, feature packed cant be beat, supports iSCSI and NFS and more. See Jason Nash’s review on the Synology 212+.
      • Only Regret – Wish I bought the DS412+ it supports VAAI with latest code and holds more drives
    • Storage – Most capacity and speed for the price I could get

    Watch the sales on Newegg, they constantly have things going out. If you are smart shrewd and have time on your hands, you could easily cut the cost down significantly.

    On to the build process

    So everything arrived from Newegg and i was like a kid in a candy store. The wife graciously allowed me to begin putting the pieces together as she wanted the boxes to disappear. I had a few issues such as a dead hard drive, the wrong ram was sent but most of that is being taken care of. I do have to say its a pretty whisper quiet set up. Even in the same room, I can’t hear the equipment minus a Cisco Switch which I have…

    The unboxed equipment waiting for me at home
    The Final Product with glowing lights.
    A few of my trials and tribulations

    I didn’t purchase a CD-Rom for the LAB so my plan was to install from a USB key. I found a nice utility (LinuxLive USB Creator) that you can use to create a bootable USB from any .iso file. I downloaded vSphere 5.0

    After I created my bootable USB with ESXi 5.0 Update 1 I thought I was in the clear and ready to begin installation. After I installed ESXi I ran into a bit of a snag, the NICs on my Host are not supported…

    I encountered this error “No compatible network adapter found. Please consult the product’s Hardware Compatibility Guide (HCG) for a list of supported adapters.

    There are two LAN controllers on the motherboard, neither are supported by ESXi 5.x

    • LAN Chipset
      Intel 82579LM
       
    • Second LAN Chipset
      Intel 82574L Duel NICs

    After some searching and afraid I was going to have to spend more money or write my own driver (been a while) I found another enterprising soul had written a driver that should be compatible with my board. VMware has a KB article on how to installing ASYNC drivers on 5.x here but there is an app for that, the ESXi customizer. The drivers supported the Intel 82574L Chipset so I currently have two Gigabit NICs. The primary NIC is non functional. I will at some point buy additional NIC cards to support more ports.

    Driver Author’s Post 
    Driver Download
    ESXi Customizer

    Download the driver above and the ESXi Customizer. It will create a custom ISO in the working directory that you can then use the LinuxLive USB Creator above to create your bootable ISO that supports the motherboard NICs.

    So after all of this I now have two ESXi hosts built at home and I am working on building the vCenter, Domain controller and other VMs soon.

    My plan is to install and do nested hypervisors for testing and script development against multiple platforms. As I make progress I will be giving LAB updates here and new scripts to share with the community.

    Nested Xenserver
    http://www.vi-tips.com/2011/10/how-to-run-xenserver-60-on-vsphere-5.html

    Nested Hyper-V
    http://www.veeam.com/blog/nesting-hyper-v-with-vmware-workstation-8-and-esxi-5.html

    Software I plan on developing for and testing in my LAB in no particular order and by no means complete just what I am thinking off the top of my head.

    • Citrix XenApp Plat using Citrix PVS, Edgesight, Single Sign On, Smart Auditor
    • Citrix XenDesktop Plat using MCS and Citrix PVS
    • Citrix Netscaler Access Gateway
    • Citrix APP-DNA
    • Citrix VDI in a Box
    • VMware View
    • VMware vCloud Director
    • VMware Horizon Suite
    • Appsense
    • Veeam
    • Windows Server 2012
    • App-V
    • Thin Clients
    • Mobile Devices and management 
    • Certification Testing and Guides

    All in all I can’t recommend building a lab enough, I think in this business building a home lab whether it be virtual using the Autolab or building a full home lab with multiple hosts or even a single host is a requirement for any professional. Every time I build anything I learn something even if its just that the Aluminum case edges are sharp 🙂 I believe it is the best way to keep your skills sharp, test new products and test yourself against them.

    Home Lab Links by the community
    Jase McCarty
    Hersey Cartwright
    Jason Boche


  • Shrinking VHD Files for Xenserver and Citrix PVS

    A question that often comes up when working with Dynamic vDisk when using Citrix Provisioning Server is does PVS automatically shrink the vDisk or is there a built in method to compact them. Citrix PVS does not have a way to do this automatically but with a few steps this can save some disk space on your storage.

    ** Update: 9/23 You can find the PowerShell script to Shrink VHD files here

    A good use case is lets say you clean up your images and remove old programs, installation files and things you no longer need, you will notice the file size does not go down. In order to maximize your storage investment, you want to keep these images as small as possible so you can do this on a regular basis.

    This method can also be used to shrink any VHD files which are used by Hyper-V, Citrix PVS, and you can even configure Windows 2008 and Windows 7 to use VHD files.

    Basic steps

    1. Make a copy of the VHD file that you have to compact 
    2. Open Server Manager
    3. Expand Storage
    4. Right-click on Disk Management on the server.
    5. Select Attach VHD.
    6. Select the required VHD File (The VHD appears as a volume on the server.)
    7. Defragment the drive for performance and storage optimization. (After defragmentation and optimization, the data on the VHD is now all at the beginning of the disk and defragmented.)
    8. Detach the VHD from within Disk Management. (Ensure that you do not delete the VHD when you are detaching the VHD.)
    9. Run the DISKPART command from a command Window.
    10. Run the following commands, substituting the path to your VHD file
      1. select vdisk file =”c:pathvdisk.vhd”
      2. attach vdisk readonly
      3. compact vdisk
      4. detach vdisk 
      5. exit

    Coming soon I will write a script that will execute against a folder and compact all VHD files in the folder. Keep an eye out here for that script 🙂