• Category Archives Powershell
  • Shrink VHD with PowerShell

    Recently I posted directions on how to manually compact VHD files in Windows 2008 R2 here. In coordination with a fellow Engineer David Ott we have now completed a Powershell Script that will handle this for you automatically. Depending on how you set your parameters this script can even be run as a scheduled task.

    I have created two versions of the script, one for Citrix Provisioning Server (PVS) environments and one for running against specified folders.
     

    Download the script for


    Update – After further testing, I have encountered an issue once while running the script on actively streamed target devices. A reboot resolved the issue. As such I will be making modifications to the script soon.

    In limited testing this script has been run on VHDs in both standard and private mode with devices streamed from Citrix Provisioning Server with no apperant impact. I have also run IOmeter while shrinking the vDisk and there was no difference in IOmeter results while disks were compacting vs disks that were not. I also performed some End User Experience testing for latency and found no impact to actively streamed devices.

    I still cannot recommend running the script in a production environment on actively streamed devices without substantial testing in your environment, as always with any script, test test and test some more and decide on how the impact to your environment.

    Reasons for the script

    Dynamic Virtual Hard Disks (VHDs) can grow to a maximum size to accommodate data as required. As data is added to the VHD, the VHD file size grows. When data is deleted from the VHD, the VHD size does not decrease. The VHD size remains at the largest amount of data stored within the VHD. Compacting a VHD reduces the VHD file size to match the amount of data stored within the VHD, therefore accurately representing the true amount of data within the VHD.

    • Optimize dynamic VHD file sizes to only use what you actually need as deleted files are not cleared from the VHD even though Storage grows on trees
    • Reduce Boot times, smaller VHD files boot faster  

    The script as written below will do the following.

    1. Add Citrix PVS Powershell Snap In
    2. Create Function to store PVS data in an object, special thanks to @CarlWebster on his PVS Documentation post that detailed how to gather and use this information
    3. Variables for PVS function to gather Store Data *** In Non_PVS script, step 1/2 are commented out
    4. Options to hard code a path in script or prompt the user to enter a path
    5. The next part will find the next available drive letter on the system and use that for the script, options are there to manually set or prompt the user as well
    6. Here is where the fun starts and begins to run DiskPart with gathered information. The process below will loop through all VHD files located in $path
      1. Attach VHD
      2. Assign $letter to attached VHD on partition 1
      3. Defragment the drive
      4. Detach VHD
      5. Attach Disk read only
      6. Compact the VHD
      7. Detach VHD

    The Script

    ##########################################################################
    # Shink VHD Files
    # This script is designed to shrink Dynamic VHD files used by products such as Citrix Provisioning Server
    # XenApp_Wizard_v1.ps1 script written by Phillip Jones and David Ott
    # Version 1.0
    # This script is provided as-is, no warrenty is provided or implied.
    #
    # The author is NOT responsible for any damages or data loss that may occur
    # through the use of this script.  Always test, test, test before
    # rolling anything into a production environment.
    #
    # This script is free to use for both personal and business use, however,
    # it may not be sold or included as part of a package that is for sale.
    #
    # A Service Provider may include this script as part of their service
    # offering/best practices provided they only charge for their time
    # to implement and support.
    #
    # For distribution and updates go to: http://www.www.p2vme.com
    ##########################################################################

    # Please uncomment this entire section if using Citrix Provisioning Services to detect and use store path

    Add-PSSnapin mclipssnapin
    Function BuildPVSObject
    {
        Param( [string]$MCLIGetWhat = ”, [string]$MCLIGetParameters = ”, [string]$TextForErrorMsg = ” )

        $error.Clear()

        If($MCLIGetParameters -ne ”)
        {
            $MCLIGetResult = Mcli-Get “$($MCLIGetWhat)” -p “$($MCLIGetParameters)”
        }
        Else
        {
            $MCLIGetResult = Mcli-Get “$($MCLIGetWhat)”
        }
        If( $error.Count -eq 0 )
        {
            $PluralObject = @()
            $SingleObject = $null
            foreach( $record in $MCLIGetResult )
            {
                If($record.length -gt 5 -and $record.substring(0,6) -eq “Record”)
                {
                    If($SingleObject -ne $null)
                    {
                        $PluralObject += $SingleObject
                    }
                    $SingleObject = new-object System.Object
                }

                $index = $record.IndexOf( ‘:’ )
                if( $index –gt 0 )
                {
                    $property = $record.SubString( 0, $index  )
                    $value    = $record.SubString( $index + 2 )
                    If($property -ne “Executing”)
                    {
                        Add-Member –inputObject $SingleObject –MemberType NoteProperty –Name $property –Value $value
                    }
                }
            }
            $PluralObject += $SingleObject
            Return $PluralObject
        }
        Else
        {
            line 0 “$($TextForErrorMsg) could not be retrieved”
            line 0 “Error returned is ” $error[0].FullyQualifiedErrorId.Split(‘,’)[0].Trim()
        }
    }
     $GetWhat = “store”
     $GetParam = “”
     $ErrorTxt = “Store Information”
     $Store = BuildPVSObject $GetWhat $GetParam $ErrorTxt
     # Path to VHD files is hard coded below
     $path = $store.path

    # Hard coded path *** Please edit and uncomment line below to set hard coded path, ex. if you want to schedule task
    # $path = “c:”

    # Please uncomment line below if you would like for the script to ask you which drive you want to use.
    # $path = Read-Host “Please enter where your VHD ‘Virtual Hard Drives’ are stored”

    # Hard coded letter *** please edit and uncomment line below if you would like to use a hard coded path
    # $letter = Read-Host “Please enter an available drive letter, format ex c: or d: not c:”

    # The lines below will detect the next legal available drive letter and choose the next available letter 
    $letter = [char[]]”DEFGJKLMNOPQRTUVWXY” | ?{!(gdr $_ -ea ‘SilentlyContinue’)} | select -f 1
    $letter = $letter + “:”

    # This is where the script will collect all vhd files in the specified folder and compact them
    $Dir = get-childitem $Path -include *.vhd -name

    foreach ($name in $dir) {
    $vdiskpath = $path + “” + $name
    $script1 = “select vdisk file=`”$vdiskpath`”`r`nattach vdisk”
    $script2 = “select vdisk file=`”$vdiskpath`”`r`nselect part 1`”`r`nassign letter=$letter”
    $script3 = “select vdisk file=`”$vdiskpath`”`r`ndetach vdisk”
    $script4 = “select vdisk file=`”$vdiskpath`”`r`nattach vdisk readonly`”`r`ncompact vdisk”
    $script1 | diskpart
    start-sleep -s 5
    $script2 | diskpart
    cmd /c defrag $letter /U
    $script3 | diskpart
    $script4 | diskpart
    $script3 | diskpart
    }

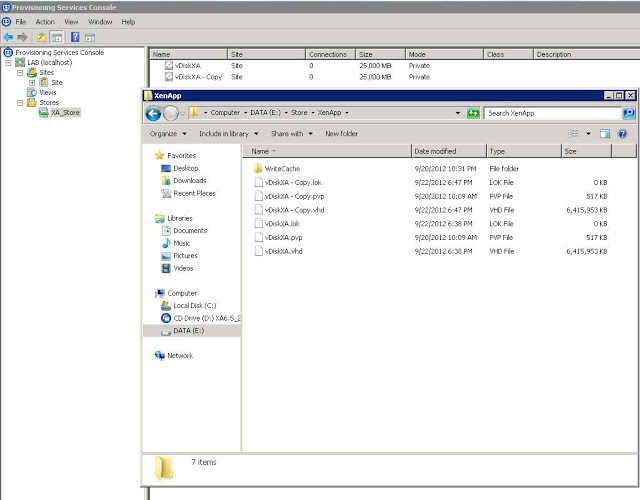
    In the screenshot you will see two VHD files located in a PVS store. Both are the same size on disk currently, one has had some files deleted by mounting the VHD manually and the space is not cleared from the VHD yet…

    The below screenshot is after the script is completed and the VHD has been compacted.

    Hope you enjoy and find this script useful, if you have suggestions, comments or issues or anything, leave me a comment below or find me on twitter at @P2Vme

  • Powershell XenApp Deployment Wizard v1

    Ever wanted an easier way to deploy XenApp machines en mass? Well have I got a treat for you.

    XenDesktop has an easy way to deploy virtual machines from Citrix Provisioning Server (PVS) but XenApp with PVS is missing this component making deploying virtual machines sometimes a very tedious task. I want to make that easier for myself, I mean the community :). I have began working on a script with another engineer and friend that should ease that pain. This script is only a v1 with future versions to support other hypervisors and remove some of the manual ad nauseum type work on large deployments.

    Currently the script is designed to do the following.

    Prerequisites:

    1. You will need to create two files currently placed in the root of C: (paths and files can be changed) 
      1. One file will contain a list of servers (servers.txt) and the other the list of ip addresses (ips.txt) Match up the lines in each file so the server and IP match up.
    2. You will need to run this script from the Provisioning Server
    3. Download and configure the Following Powershell Snap Ins
      1. XenServer Powershell Snap-IN
        1. Download XS-PS Windows installer
      2. Configure the PVS Powershell MCLI snap in
        1. The snapin comes with the Provisioning Services Console. To use the snapin, you have to first register it (requires .Net framework). If your Windows is 32bits, use this command: 
          1. “C:WindowsMicrosoft.NETFrameworkv2.0.50727installutil.exe” “C:Program FilesCitrixProvisioning Services ConsoleMcliPSSnapIn.dll” 
        2. For 64bits: “C:WindowsMicrosoft.NETFramework64v2.0.50727installutil.exe” “C:Program FilesCitrixProvisioning Services ConsoleMcliPSSnapIn.dll” 
        3. If you encountered error, make sure that you are running the Command Prompt as administrator. 
        4. Once registered, start a PowerShell console and add the snapin using “add-PSSnapIn mclipssnapin”. The main cmdlets are mcli-run, mcli-get, mcli-set and mcli-delete. To get a detailed help on the cmdlets, use mcli-help.

    Once you have completed the prerequisites you can run the script. The script is currently designed to do the following.

    1. Enter variables needed for script to run and confirm settings
    2. Create XenServer VMs based upon servers identified in c:servers.txt from template
    3. Create c:macs.txt listing all Mac addresses for each XenServer VM created from servers.txt
    4. Add IP MAC Reservations to primary Microsoft DHCP Server
    5. Add Devices to Citrix PVS server in appropriate collection and Site
    6. Export IP Mac Reservations from primary Microsoft DHCP server to Secondary DHCP server

    As this script is a v1 it is making a lot of assumptions and I plan on building more logic and support for various configurations into the script. If you have any ideas or suggestions, please leave me a comment or contact me.

    Upcoming Features

    • VMware Support

    ##########################################################################
    # XenApp PVS Deployment Wizard
    # This script is designed to help deploy XenApp machines en masse to a XenApp Farm using XenServer and Microsoft DHCP
    # XenApp_Wizard_v1.ps1 script written by Phillip Jones and David Ott
    # Version 1.0
    # This script is provided as-is, no warrenty is provided or implied.
    #
    # The author is NOT responsible for any damages or data loss that may occur
    # through the use of this script.  Always test, test, test before
    # rolling anything into a production environment.
    #
    # This script is free to use for both personal and business use, however,
    # it may not be sold or included as part of a package that is for sale.
    #
    # A Service Provider may include this script as part of their service
    # offering/best practices provided they only charge for their time
    # to implement and support.
    #
    # For distribution and updates go to: http://www.wwwp2vme.com
    ##########################################################################

    add-pssnapin xenserverpssnapin
    add-pssnapin mclipssnapin

    # Variables Section – This will define the variables that the script requires in order to create the VMs in DHCP, PVS and XenServer

    $sitename = Read-Host “Enter the PVS Site Name.”
    $collectionname = Read-Host “Enter the PVS collection name.”
    $xenserver = Read-Host “Enter the XenServer host name to connect to.”
    $XSBase = Read-Host “Enter the base VM to copy. (Case Sensitive!)”
    $SR = Read-Host “Enter the storage repository name. (Case Sensitive!)”
    $pdhcpip = Read-Host “Enter the IP address of the primary DHCP server.”
    $sdhcpip = Read-Host “Enter the IP address of the secondary DHCP server.”
    $pdhcpscope = Read-Host “Enter the DHCP scope (ie:10.xxx.xxx.0).”

    ” “
    “Please confirm before continuing.”
    ” “

    “PVS Site Name: “+$sitename
    “PVS Collection Name: “+$collectionname
    “XenServer: “+$xenserver
    “Base VM: “+$XSBase
    “Storage Repository: “+$SR
    “Primary DHCP IP: “+$pdhcpip
    “Secondary DHCP IP: “+$sdhcpip
    “DHCP Scope: “+$pdhcpscope

    $n = ([System.Management.Automation.Host.ChoiceDescription]”&No”)
    $n.helpmessage = “No, exit script”
    $Y = ([System.Management.Automation.Host.ChoiceDescription]”&Yes”)
    $y.helpmessage = “Yes, continue script”
    $YN= ($Y,$N)

    Function Prompt-YesNo ($Caption = “Confirm”, $Message = “Do you want to continue?”,$choices = $YN)
        {
            $host.ui.PromptForChoice($caption,$Message,[System.Management.Automation.Host.ChoiceDescription[]]$choices,1)
        }

    $answer = Prompt-YesNo
        if ($answer -eq 0) {“Continue”} else {Exit}
            Connect-XenServer -server $xenserver
            cmd /c if not exist c:csv md c:csv
        if (Test-Path c:macs.txt) {remove-item c:macs.txt}
            $vmnames = get-content c:servers.txt
            $ips = get-content c:ips.txt
            Remove-Item c:csv*.*

    # Xenserver – create VMs then pull MAC addresses for each and append c:MACs.txt

    foreach ($vmname in $vmnames)
        {
        Invoke-Xenserver:VM.Copy -VM $XSBase -NewName $vmname -SR $SR
            $vifs = Get-XenServer:VM.VIFs -VM $vmname
            $vmname | Out-File c:CSVVMs.csv -append -Encoding ASCII
            $vifs.mac | Out-File c:MACs.txt -append -Encoding ASCII
        }

    # MAC Translations – Required for DHCP and PVS as MAC formats are different for each program
    # PVS MAC MCLI input format
    Get-Content c:MACs.txt | ForEach-Object { $_ -replace “:”, “-” } | Set-Content c:csvMDevice.csv

    # DHCP MAC input format
    Get-Content c:MACs.txt | ForEach-Object { $_ -replace “:”, “” } | Set-Content c:csvMDHCP.csv

    # Obtain IP addresses from ips.txt file
    Get-Content c:ips.txt | Set-Content c:csvips.csv
        $num = 0
        $items = get-content c:csvvms.csv

    # DHCP and Citrix PVS
    foreach ($item in $items)
        {
            $server = get-content C:csvVMs.csv | Select-Object -Index $num
            $mdhcp = get-content C:csvMDHCP.csv | Select-Object -Index $num
            $ip = Get-Content C:csvips.csv | Select-Object -Index $num
            $mdevice = Get-Content C:csvMDevice.csv | Select-Object -Index $num
            “Dhcp Server \”+$pdhcpip+” Scope “+$pdhcpscope+” Add reservedip “+$ip+” “+$mdhcp+” “+”`”$server`””+” “+”`”`””+” “+”`”DHCP`”” | Out-File c:csvprimdhcp.txt -append -Encoding ASCII
            “Dhcp Server \”+$sdhcpip+” Scope “+$pdhcpscope+” Add reservedip “+$ip+” “+$mdhcp+” “+”`”$server`””+” “+”`”`””+” “+”`”DHCP`”” | Out-File c:csvsecdhcp.txt -append -Encoding ASCII
    # Citrix PVS add device to Site and Collection
            Mcli-Add Device -r siteName=$siteName, collectionName=$collectionName, deviceName=$server, deviceMac=$mdevice
            $num = $num + 1
        }

    “@Echo Off” | out-file c:csvdhcpimport.cmd -encoding ASCII

    #DHCP – This will export the settings of the DHCP reservations added above
    “netsh exec c:csvprimdhcp.txt” | out-file c:csvdhcpimport.cmd -append -encoding ASCII

    #DHCP – This will import the reservations on your secondary Microsoft DHCP server
    “netsh exec c:csvsecdhcp.txt” | out-file c:csvdhcpimport.cmd -append -encoding ASCII
    “echo Please verify all objects have been created successfully” | out-file C:csvdhcpimport.cmd -append -encoding ASCII
    “pause” | out-file C:csvdhcpimport.cmd -append -encoding ASCII
    Remove-Item c:csv*.csv
    cmd /c C:csvdhcpimport.cmd


  • Powershell Any Device Any Where

    Ever wanted to do Powershell from your mobile phone, tablet or any device on the network maybe even from your Mac for you Apple Fanboys out there (guilty as charged). Well now with Windows Server 8 you can set up Powershell Web Access in IIS.

    That’s right, any browser over an https connection that can do javascript and allows cookies will give you powershell at your fingertips. I think this is a great feature for Windows Server 8 and one that I plan on using.

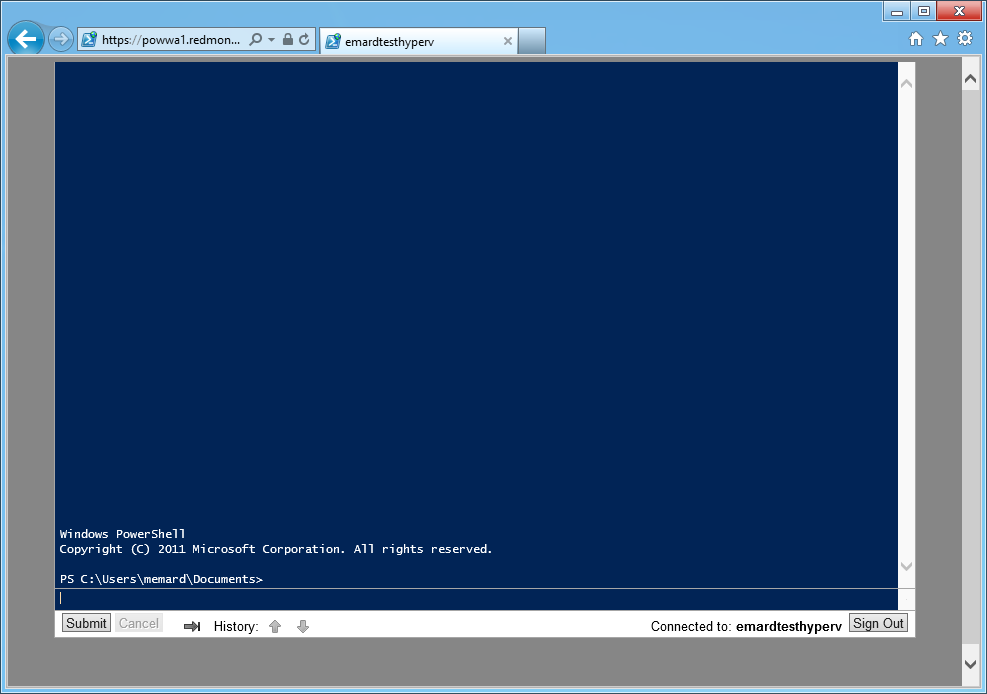
    Here is what Powershell Web Access will look like on Windows Server 8. For a full write up on Powershell Web Access check out the official blog.

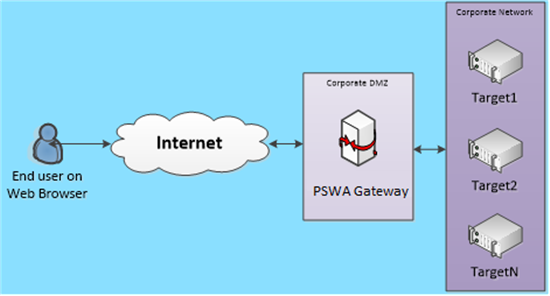
    Once Windows PowerShell Web Access is installed and configured it will act as a gateway between users on their web browsers and target machines they want to manage.

     I have a soft spot for Powershell as I use it to manage many of the products I implement. It unifies a lot of my scripting. Powershell works for many of the leading products out there, not just Microsoft products and there is a huge community out there for Powershell currently.

    Some of the products you can use Powershell with. This list is by no means complete but provides a sample of products that I use Powershell to manage. If you know of additional products, leave a comment with the product and your experience with it if any.