• Category Archives Citrix
  • Citrix AppDNA Extended No Charge No Limit Trial

    It has been a while since I have used AppDNA but I have found the product very useful for testing OS and streaming compatibility with OS upgrades, App-V sequencing and Citrix Application streaming. For those planning or doing a migration, you have a great opportunity as Citrix has a pretty exciting offer on AppDNA I don’t think many can resist.

    From the Article

    Expanded No-Charge Application Compatibility Trial for Application Migration Initiatives – Even Windows 8

    This week at Citrix Synergy and Summit, Citrix announces a new version of the AppDNA application migration software that includes an expanded no-charge trial with application testing and effort modeling for an unlimited number of applications.  The new service pack release also includes early access features for testing application compatibility for the new Microsoft Windows 8, Internet Explorer 10 and Windows Server 2012 releases. The new AppDNA 6.1 Service Pack 1 is available today via the AppDNA trial or for current AppDNA customers via myCitrix.
    Application Compatibility Testing for an Unlimited Amount of Applications
    Whether you’re starting a proof of concept for a migration from XP or a pilot of a virtualization project on XenDesktop, you need to start by sizing the compatibility of the application portfolio. With the new Citrix AppDNA software trial, application compatibility testing for 10, 100 or even 1,000 of your most important enterprise applications can now be sampled with the AppDNA trial.   Additionally, the AppDNA trial provides a taste of the powerful AppDNA application remediation information for 10 applications (5 MSI, 5 web apps).
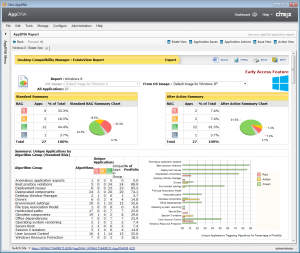
    Look carefully at the screenshot here (click to enlarge) –  it’s showing the application compatibility of a sample set of 27 applications for an enterprise looking to migrate from Windows XP to Windows 8.  On the left hand side, the AppDNA trial report is showing that before any application remediation, 44.4% of the applications will be a green light for migration- they shouldn’t have any major application compatibility issues. On the right hand side, the chart is showing after taking the appropriate application remediation steps, 81.5% of the applications can be a green light for deployment.

    AppDNA application compatibility estate view report
    Unlimited import of applications shows the current state of the application portfolio and the application compatibility work needed to move to a new technology, like Windows 8 

    The AppDNA trial report is also showing the kinds of application compatibility issues in this sample set of applications. Now you know the level of difficulty in application remediation. Use this information to plan timelines, staff and training needed to troubleshoot application compatibility. (See previous blog: Correctly Staffing Application Compatibility Projects: Gut Feel or Data Driven)
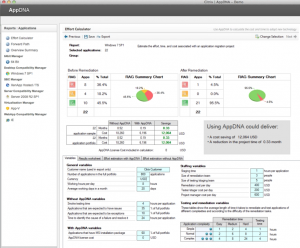
    Plus, as part of the no-charge AppDNA trial, enterprises can use the AppDNA Effort Calculator to model the time, cost and staff needed to address the specific application compatibility issues in their application portfolio.  (See previous blog: How Much Budget for Application Compatibility?) See the changes to your application migration plan if you add more people to the project or if your deadline is suddenly 3 months sooner than expected.  Best of all, see the cost savings of automating application compatibility over months and months of manual testing efforts.

    AppDNA application compatibility trial includes application migration effort calculator

    Determine the application compatibility effort needed to move to a new technology

    Remember, the AppDNA software shows you the exact application remediation detail – and recommends steps to fix the application. With the new AppDNA trial, see the application remediation detail for 10 applications (5 MSI, 5 web based) and learn how powerful the AppDNA software can be for your organization.

    What kind of peace of mind would you have in planning your move from XP to Windows 7 or Windows 8 if you could look into the crystal ball and know your success rate? Would you plan an upgrade to the latest XenApp release if you knew your application compatibility success rate? Well, now you can sample application compatibility success with AppDNA software – and at no cost.
    For Citrix partners, this new AppDNA trial is an incredible opportunity to be the trusted advisor for application migration – whether for an OS migration, virtualization project or combined effort – using the no-charge trial reports for scoping the effort, time and cost of projects. Quote the project accurately and help customers migrate with less challenge.

    The fine print: the trial is valid for 30 days and is limited to 1 trial per enterprise. Now – go forth and test your applications via the AppDNA trial.
  • XenServer 6.1 Released

    Citrix Systems announced today the GA release of XenServer 6.1, formerly Project “Tampa” I will be upgrading my lab soon to this release to test these new features which as I can I will be diving into here in more detail.

    New Features in this release that caught my attention

    • Storage XenMotion
    • Live VDI Migration
    • LACP support 
    • SLB (Source Load Balancing) Bond up to 4 NICs in an active/active configuration


    XenServer 6.1.0 includes the following new features and ongoing improvements:
     
    Storage XenMotion:
    Storage XenMotion allows running VMs to be moved from one host to another. This includes the case where (a) VMs are not located on storage shared between the hosts and (b) hosts are not in the same resource pool. This enables system administrators to:

    • Rebalance or move VMs between XenServer pools – for example promoting a VM from a development environment to a production environment;
    • Perform software maintenance – for example upgrading or updating standalone XenServer hosts without VM downtime;
    • Perform hardware maintenance – for example upgrading standalone XenServer host hardware without VM downtime;
    • Reduce deployment costs by using local storage.

    For more information, refer to the XenServer 6.1.0 Virtual Machine User’s Guide and the XenCenter online help.

    Live VDI Migration:
    Live VDI Migration allows system administrators to relocate a VM’s Virtual Disk Image (VDI) without shutting down the VM. This enables system administrators to:

    • Move a VM from cheap, local storage to fast, resilient, array-backed storage;
    • Move a VM from a development to a production environment;
    • Move between tiers of storage when a VM is limited by storage capacity;
    • Perform storage array upgrades.

    Networking Enhancements

    • Link Aggregation Control Protocol (LACP) support: enables the use of industry-standard network bonding features to provide fault-tolerance and load balancing of network traffic.
    • Source Load Balancing (SLB) improvements: allows up to 4 NICs to be used in an active-active bond. This improves total network throughput and increases fault tolerance in the event of hardware failures. The SLB balancing algorithm has been modified to reduce load on switches in large deployments.
    • Multi-Tenancy improvements: allows system administrators to restrict a VM to send and receive traffic on a specific MAC address and a number of IPv4 or IPv6 addresses, without relying on VLANs and switch management software. When these extensions are deployed VMs cannot impersonate any other VM, or intercept traffic intended for any other VM. This increases security in environments where VMs cannot be fully trusted. For detailed configuration see the XenServer 6.1.0 Administrator’s Guide
    • VLAN Scalability improvements: removes a previous limitation which caused VM deployment delays when large numbers of VLANs were in use. This improvement enables administrators using XenServer 6.1.0 to deploy hundreds of VLANs in a XenServer pool quickly.
    • Emergency Network Reset: provides a simple mechanism to recover and reset a host’s networking, allowing system administrators to revert XenServer hosts to a known good networking state. Refer to CTX131972 and the XenServer 6.1.0 Administrator’s Guide for detailed information.
    • IPv6 Guest Support: enables the use of IPv6 addresses within guests allowing network administrators to plan for network growth.

    Guest Enhancements

    • Citrix XenServer Conversion Manager: enables batch import of VMs created with VMware products into a XenServer pool to reduce costs of converting to a XenServer environment. Refer to the XenServer Conversion Manager Guide.
    • New Installation Mechanism for XenServer Tools: XenServer Tools are now delivered as industry standard Windows Installer MSI files. This enables the use of 3rd party tools to deliver and manage the installation and upgrade of the XenServer device drivers. For more information on MSI files refer to http://technet.microsoft.com/en-us/library/bb742606.aspx

    Enhanced Guest OS Support: Newly Supported Guests

    • Ubuntu 12.04
    • CentOS 5.7, 6.0, 6.1, 6.2
    • Red Hat Enterprise Linux 5.7, 6.1, 6.2
    • Oracle Enterprise Linux 5.7, 6.1, 6.2
    • Windows 8 (32-bit/64-bit) – experimental support
    • Windows Server 2012 – experimental support

    Refer to the XenServer 6.1.0 Guest Support Guide for virtual memory and disk size limits for these new guests. 

    Ongoing Improvements

    • Supported number of VMs per host increased to 150.
    • XenCenter: configuration of performance graphs simplified; assignment of IP addresses simplified.
    • Performance Monitoring Enhancements Supplemental Pack: provides additional RRD metrics such as I/O throughput that can be viewed in XenCenter. Refer to CTX135033 for details
    • XenServer Tools: guests running Windows operating systems can now make use of either Microsoft .NET 3.5 or .NET 4.0 when installing XenServer Tools.
    • Simplified mechanism to adjust Control Domain (“dom0”) vCPUs. Refer to CTX134738 for details.
    • Updated Open vSwitch: v1.4.2 provides stability and performance improvements. For more information refer to http://openvswitch.org.
    • Integrated StorageLink (iSL) support for EMC VNX series arrays.
    • GPU Pass-through: support for up to 4 GPUs per host.
    • Interoperability extensions for 3rd Party Tools: additional asynchronous XenAPI C language bindings, Workload Balancing (WLB) extensions and general improvements. Refer to CTX135078 – XenServer 6.1.0 SDK Release Notes and CTX134685 – Workload Balancing 6.1 Release Notes.
    • Automated Server Hardware Test Kit – reduces the time spent running certification tests – refer to the Verification Test Kits & Forms for Citrix XenServer for more information.
    • Support for hypervisor monitoring (vhostmd) allows SAP software to run inside a XenServer VM. Refer to CTX134790 for configuration details.

    The following components have been updated since the release of XenServer 6.0:

    XenServer Virtual Appliances

    The following XenServer Virtual Appliances are available for download from the XenServer Download page

    • Demo Linux Virtual Appliance
    • Workload Balancing 6.1.0 Virtual Appliance
    • vSwitch Controller Virtual Appliance
    • Web Self Service 1.1.2 Virtual Appliance
    • Citrix License Server VPX v11.10
    • Citrix XenServer Conversion Manager

    Installation and Upgrades

    Upgrade to XenServer 6.1.0 is possible from any version of XenServer 6.0 or 5.6, including 5.6 (base), 5.6 Feature Pack 1, 5.6 Service Pack 2, 6.0 and 6.0.2. For details on details on installing and upgrading XenServer refer to the Citrix XenServer 6.1.0 Installation Guide. Before upgrading XenServer hosts, customers should ensure that they are not affected by any of the listed issues listed below.

    Known Issues and Errata

    This section details known issues with this release and any workarounds that can be applied. For Workload Balancing see CTX134684 – Workload Balancing Release Notes. For XenServer Conversion Manager, see CTX134685 – XenServer Conversion Manager Release Notes

    Installation and Upgrade

    • RHEL, OEL, and CentOS 5.0 64-bit guest operating systems with the original kernel will fail to boot on XenServer 6.1.0. Before attempting to upgrade a XenServer host to version 6.1.0, customers should update the kernel to version 5.4 (2.6.18-164.el5xen) or later. Customers running these guests who have already upgraded their host to XenServer 6.1.0, should refer to CTX134845 for information on upgrading the kernel. [CA-79505]
    • RHEL 4.5 guests may crash when using the Rolling Pool Upgrade Wizard. Before upgrading a XenServer host, you must shut down RHEL 4.5 guests. Once the host is upgraded, you must update the guest kernels using the one supplied on the XenServer 6.1.0 XenServer Tools ISO. [CA-88618]
    • If the Rolling Pool Upgrade Wizard discovers storage that is detached and cannot be reattached, it will fail (even when no VMs are using the storage). Customers should either fix the access to the storage repository or remove it from the XenServer pool before restarting the wizard. [CA-72541]
    • Rolling Pool Upgrade should not be used with Boot from SAN environments. For more information on upgrading boot from SAN environments see Appendix B of the XenServer 6.1.0 Installation Guide .
    • When installing XenServer from a network repository (including when using the XenCenter Rolling Pool Upgrade wizard), you must configure the DHCP server to provide the domain-name option, otherwise DNS will not work correctly, which can lead to a failed installation. [CA-74082]
    • Shared storage should not be specified as the either the primary-disk or the guest-diskduring host installation. Storage specified during installation for both the primary-disk and the guest-disk will be formatted. [CA-41786]
    • When running more than 50 VMs per XenServer host, the steps in CTX134951 should be followed to reconfigure dom0 memory settings. [CA-48485]

    Internationalization

    • Non-ASCII characters, such as characters with accents, cannot be used in the host console. [CA-40845]
    • The root password of the host installer must not contain non-ASCII characters. [CA-47461]

    Hardware Compatibility

    Note: Customers should refer to the XenServer Hardware Compatibility List (HCL) for the most recent additions and advice for all hardware compatibility questions.

    • Intel Errata for Nehalem and Westmere CPU implementations of C-states may lead to system instability, apparently random freezes or reboots — including during installation. Customers with Nehalem and Westmere CPUs are advised to disable C-states in the system BIOS as detailed in CTX127395. [CA-60628]
    • Brocade’s BFA Fibre Channel over Ethernet (FCoE) driver version 3.1.0, as shipped with XenServer 6.1.0, requires FCoE Initialization Protocol (FIP) login. Customers should ensure that the FCoE switch is correctly configured to accept such logins, otherwise access to the storage may be lost. [CA-88468]

    Networking

    • For active-active bonds on the vSwitch network stack, the bond rebalancing interval has changed from 10 seconds to 30 minutes. If your environment requires more frequent rebalancing, refer to CTX134947 for instructions on how to change the bond rebalancing intervals. [CA-90457]
    • After an upgrade, customers using Single Root I/O Virtualization (SR-IOV) with Intel NICs will be unable to start VMs. Customers should follow the procedure in CTX134054. [CA-89008].
    • QoS settings do not work when set through XenCenter or the xe CLI. Customers should use the vSwitch Controller to create QoS settings. [CA-90580]
    • DHCP lease renewal fails if the DHCP client and DHCP server are both Linux VMs on the same host. This does not affect Windows VMs. If you wish to use dhcp3-server and dhcp3-client in Linux VMs which may be sharing the same host, you must disable checksum offload by issuing the command ethtool -K eth0 tx off within the DHCP server VM. [CA-40908]
    • When using the vSwitch Controller with Microsoft Internet Explorer (IE) version 7 or 8 to access the vSwitch Controller remotely, you may find that these versions of IE leak system resources. Citrix recommends using either Mozilla Firefox or IE 9, which addresses some of the known IE memory and resource leak issues. [CA-65261]
    • The vSwitch Controller may fail to show slave networks that had been bonded when NIC bonds are deleted. To resolve this issue, refresh the status of the pool or restart the vSwitch Controller. The networks should then reappear. [CA-65261]

    Storage

    • Customers using XenServer Platinum Edition to license Citrix Provisioning Services (PVS) may find that one PVS license per VM is checked out, rather than one PVS license per XenServer host. This may lead to a shortage of PVS licenses and an inability to provision VMs. Citrix recommends that customers do not install the standard 6.1.0 XenServer Tools, if they are dependent on Platinum Licensing for PVS. Refer to CTX135099. [CA91014]
    • XenServer reports the amount of space used by a virtual disk (VDI), but this number may be substantially out of date. [CA-51466]
    • When migrating VMs using Storage XenMotion, attempts to cancel the operation may not delete the temporary virtual disks. [CA-87710] [CA-87689]
    • When a VM is unexpectedly shut down during a Storage XenMotion migration, the migration may fail. This process may leave a shut down incomplete copy of the VM on the destination pool. Customers should delete the VM from the destination pool and re try the operation with the VM running. [CA-86347]
    • When using the xe CLI to migrate a VM with a snapshot using Storage XenMotion, you must provide a destination SR for each snapshot VDI. This issue does not occur the first time that a VM is migrated. [CA-78901]
    • Quiesced snapshots are not supported for Microsoft Windows Server 2008 R2 VMs. In addition, Microsoft Windows Vista, Windows Server 2008, Windows 7 guests running the standard 6.1.0 XenServer Tools do not support quiesced snapshots (VSS). As a workaround, customers requiring quiesced snapshots on Microsoft Windows Vista, Windows Server 2008, and Windows 7 should install the legacy XenServer Tools. Refer to CTX135099. [CA-32734]
    • Attempts to revert to a snapshot fail if the SR has too little space to inflate the snapshot. This is caused by a race condition and can be resolved by re-attempting the revert after a few minutes. [CA-63032]
    • Writing to CIFS ISO storage repositories is not supported and can result in disk corruption. [CA-41058]
    • If an ISO SR is stored on an NFS server, and the connection to the server is temporarily lost, you may need to restart your XenServer host in order to regain connection. [CA-10471]
    • If a Storage array reports IPv6 addresses the following error may be displayed: ValueError: too many values to unpack or received signal: SIGSEGV. To workaround this issue, disable IPv6 on the storage array. [CA-90269] [CA-90271]
    • Customers using Dell EqualLogic arrays with Integrated Storage Link (iSL) should only use the firmware from the 5.x branch. This firmware has been verified and tested for use with iSL. Refer to the XenServer Hardware Compatibility List (HCL) for the recommended firmware version.
    • Customers using Dell EqualLogic arrays with version 4.x or earlier firmware with Integrated StorageLink (iSL), may find Revert to Snapshot operations fail. Customers should upgrade their Dell array firmware to version 5.x. [CA-77976]
    • Customers using Dell EqualLogic arrays with Integrated StorageLink (iSL) performing certain manual VDI delete operations with snapshots, may encounter VDI not available errors when attempting to start a VM based on array resources. Citrix recommends that customers only perform VM Snapshots and Revert operations when using iSL with Dell EqualLogic. [CA-78670]
    • Customers using EMC VNX series arrays with Integrated StorageLink (iSL) may experience issues when carrying out snapshot operations. The array may hang and the iSL process time out. This incomplete operation may be incorrectly reported as having succeeded by iSL. In some cases, the array may recover automatically from this state and complete the snapshot task, creating a VDI which is unknown to the XenServer host. The workaround is to reboot the EMC VNX Storage Processor. [CA-90199]
    • When attempting a snapshot operation on an EMC VNX series array using iSL, snapshot operations may fail. The EMC Unisphere GUI will report volume trespass and the SMlog and iSL-trace.log will contain the error: SAN Copy operations cannot span SPs. In this event, the administrator should “un-trespass” the volume before re-trying the operation. Refer to the EMC VNX series documentation for further information. [CA-74642]

    XenCenter

    • Modifying the font size or DPI on the computer on which XenCenter is running can result in the user interface displaying incorrectly. The default font size is 96 DPI; Windows Vista refers to this as “Default Scale” and Windows 7 as “100%”. [CA-45514]

    Guests

    • When using High Availability (HA) in an environment where the protected VMs use VLANs, HA may be unable to detect that a VM is agile: it cannot therefore plan a suitable recovery procedure. In this case, customers may find that their XenServer pools unexpectedly become “overcommitted”, or that they may be unable to use HA. To work around these issues, refer to CTX135049. [CA-74343]
    • To uninstall the XenServer 6.1.0 Tools, customers should follow the advice in CTX135099. Customers should not use the MSI uninstaller included on the XenServer Tools ISO as this can lead to a BSOD on boot. [CA-91327]
    • If a VM’s VBD is unplugged and the VM is then rebooted, the VBD will remain unplugged after reboot. [CA-76612]
    • Locking modes for VIFs may not be preserved when exporting and then re-importing a VM when using XVA or OVF formats. [CA-90857]
    • Upgrading the XenServer Tools on a Windows VM that is actively using Dynamic Memory Control (DMC) may cause the VM to crash. To avoid this, during the XenServer Tools upgrade, set the dynamic minimum and maximum values to the static maximum. [CA-90447]
    • A VM snapshot cannot be resumed if it was created while a previous version of the XenServer Tools ISO was mounted in the VM. To restart from one of these snapshots, customers should “Force Shutdown” the suspended VM, eject the ISO and start the VM. [CA-59289]
    • The XenServer SDK VM as shipped in previous version of XenServer has been removed. Customers should not attempt to use the Xen API SDK VM template. As an alternative sandbox testing environment, you can install XenServer as a generic HVM Guest using the Other install media template (2048MB of memory and a disk size of at least 12GB is recommended). Note that the Guest’s IP address will not be reported though the CLI or XenCenter. [CA-89266]
    • After using XenMotion (Live Migration) to move a Windows VM, the memory usage reported for the VM may be incorrect. [CA-89580]
    • After upgrading a pool to XenServer 6.1.0, VMs migrated during the upgrade process, and VMs suspended before the upgrade (and then resumed), do not report that their XenServer Tools are out of date until the VM is rebooted. [CA-89023]
    • Verification of manifests and digital signatures on OVF and OVA packages will fail on import if the filename contains parenthesis. The import will still succeed if verification is skipped. For the same reason, if you are exporting VMs as an OVF/OVA package and are including a manifest or a digital signature, Citrix recommends specifying a package name that does not contain parentheses. [CA-89555] [CA-90365]
    • Attempts to detach a Virtual Disk Image (VDI) from a running a RHEL, CentOS, or OEL 6.1 and 6.2 (32-/64-bit) VM, may be unsuccessful and can result in a guest kernel crash with a NULL pointer dereference at <xyz> error message. For more information, see Red Hat Bugzilla 773219. [CA-73512]
    • A Windows VM may fail to boot correctly if streaming from PVS version 5.1. This is an intermittent fault, and rebooting the VM should resolve the issue. [CA-60261]
    • If you wish to create an Ubuntu 10.04 VM (32-bit) with more than 512MB of memory, you must upgrade to the latest version of the kernel before increasing the RAM. For more information, see Ubuntu Launchpad 803811 and 790747. [CA-61400]
    • Ubuntu 10.04 (64-bit) running the 2.6.32-32 #72 kernel, may crash with the following message, kernel BUG at /build/build/linux-2.6.32/arch/x86/xen/spinlock.c:343!. The problem only affects VMs with multiple vCPUs. vCPU hotplugging (only available via the xe CLI/API) should not be attempted with this guest. [CA-57168]
    • Customers running RHEL or CentOS 5.3 or 5.4 (32/64-bit) should not use Dynamic Memory Control (DMC) as this may cause the guest to crash. If you wish to use DMC, Citrix recommends that customers upgrade to more recent versions of RHEL or CentOS. [EXT-54]
    • The RHEL 6.0 kernel has a bug which affects disk I/O on multiple virtualization platforms. This issue causes VMs running RHEL 6.0 to lose interrupts. For more information, see Red Hat Bugzilla 681439, 603938 and 652262. [CA-60495]

    Documentation

    • XenServer product documentation may refer to StorageLink and Integrated StorageLink (iSL) interchangeably. Whenever references are made to StorageLink in XenServer 6.0 documentation and later, this refers to the Integrated StorageLink functionality and not to the deprecated Citrix product StorageLink Gateway.

    Documentation and Support

    Finding Documentation

    For the most up-to-date product documentation for every Citrix product, visit the Citrix Knowledge Center. Additional information is also available from Citrix eDocs.
    For licensing documentation, go to the Licensing Your Product section on Citrix eDocs.


  • Shrink VHD with PowerShell

    Recently I posted directions on how to manually compact VHD files in Windows 2008 R2 here. In coordination with a fellow Engineer David Ott we have now completed a Powershell Script that will handle this for you automatically. Depending on how you set your parameters this script can even be run as a scheduled task.

    I have created two versions of the script, one for Citrix Provisioning Server (PVS) environments and one for running against specified folders.
     

    Download the script for


    Update – After further testing, I have encountered an issue once while running the script on actively streamed target devices. A reboot resolved the issue. As such I will be making modifications to the script soon.

    In limited testing this script has been run on VHDs in both standard and private mode with devices streamed from Citrix Provisioning Server with no apperant impact. I have also run IOmeter while shrinking the vDisk and there was no difference in IOmeter results while disks were compacting vs disks that were not. I also performed some End User Experience testing for latency and found no impact to actively streamed devices.

    I still cannot recommend running the script in a production environment on actively streamed devices without substantial testing in your environment, as always with any script, test test and test some more and decide on how the impact to your environment.

    Reasons for the script

    Dynamic Virtual Hard Disks (VHDs) can grow to a maximum size to accommodate data as required. As data is added to the VHD, the VHD file size grows. When data is deleted from the VHD, the VHD size does not decrease. The VHD size remains at the largest amount of data stored within the VHD. Compacting a VHD reduces the VHD file size to match the amount of data stored within the VHD, therefore accurately representing the true amount of data within the VHD.

    • Optimize dynamic VHD file sizes to only use what you actually need as deleted files are not cleared from the VHD even though Storage grows on trees
    • Reduce Boot times, smaller VHD files boot faster  

    The script as written below will do the following.

    1. Add Citrix PVS Powershell Snap In
    2. Create Function to store PVS data in an object, special thanks to @CarlWebster on his PVS Documentation post that detailed how to gather and use this information
    3. Variables for PVS function to gather Store Data *** In Non_PVS script, step 1/2 are commented out
    4. Options to hard code a path in script or prompt the user to enter a path
    5. The next part will find the next available drive letter on the system and use that for the script, options are there to manually set or prompt the user as well
    6. Here is where the fun starts and begins to run DiskPart with gathered information. The process below will loop through all VHD files located in $path
      1. Attach VHD
      2. Assign $letter to attached VHD on partition 1
      3. Defragment the drive
      4. Detach VHD
      5. Attach Disk read only
      6. Compact the VHD
      7. Detach VHD

    The Script

    ##########################################################################
    # Shink VHD Files
    # This script is designed to shrink Dynamic VHD files used by products such as Citrix Provisioning Server
    # XenApp_Wizard_v1.ps1 script written by Phillip Jones and David Ott
    # Version 1.0
    # This script is provided as-is, no warrenty is provided or implied.
    #
    # The author is NOT responsible for any damages or data loss that may occur
    # through the use of this script.  Always test, test, test before
    # rolling anything into a production environment.
    #
    # This script is free to use for both personal and business use, however,
    # it may not be sold or included as part of a package that is for sale.
    #
    # A Service Provider may include this script as part of their service
    # offering/best practices provided they only charge for their time
    # to implement and support.
    #
    # For distribution and updates go to: http://www.www.p2vme.com
    ##########################################################################

    # Please uncomment this entire section if using Citrix Provisioning Services to detect and use store path

    Add-PSSnapin mclipssnapin
    Function BuildPVSObject
    {
        Param( [string]$MCLIGetWhat = ”, [string]$MCLIGetParameters = ”, [string]$TextForErrorMsg = ” )

        $error.Clear()

        If($MCLIGetParameters -ne ”)
        {
            $MCLIGetResult = Mcli-Get “$($MCLIGetWhat)” -p “$($MCLIGetParameters)”
        }
        Else
        {
            $MCLIGetResult = Mcli-Get “$($MCLIGetWhat)”
        }
        If( $error.Count -eq 0 )
        {
            $PluralObject = @()
            $SingleObject = $null
            foreach( $record in $MCLIGetResult )
            {
                If($record.length -gt 5 -and $record.substring(0,6) -eq “Record”)
                {
                    If($SingleObject -ne $null)
                    {
                        $PluralObject += $SingleObject
                    }
                    $SingleObject = new-object System.Object
                }

                $index = $record.IndexOf( ‘:’ )
                if( $index –gt 0 )
                {
                    $property = $record.SubString( 0, $index  )
                    $value    = $record.SubString( $index + 2 )
                    If($property -ne “Executing”)
                    {
                        Add-Member –inputObject $SingleObject –MemberType NoteProperty –Name $property –Value $value
                    }
                }
            }
            $PluralObject += $SingleObject
            Return $PluralObject
        }
        Else
        {
            line 0 “$($TextForErrorMsg) could not be retrieved”
            line 0 “Error returned is ” $error[0].FullyQualifiedErrorId.Split(‘,’)[0].Trim()
        }
    }
     $GetWhat = “store”
     $GetParam = “”
     $ErrorTxt = “Store Information”
     $Store = BuildPVSObject $GetWhat $GetParam $ErrorTxt
     # Path to VHD files is hard coded below
     $path = $store.path

    # Hard coded path *** Please edit and uncomment line below to set hard coded path, ex. if you want to schedule task
    # $path = “c:”

    # Please uncomment line below if you would like for the script to ask you which drive you want to use.
    # $path = Read-Host “Please enter where your VHD ‘Virtual Hard Drives’ are stored”

    # Hard coded letter *** please edit and uncomment line below if you would like to use a hard coded path
    # $letter = Read-Host “Please enter an available drive letter, format ex c: or d: not c:”

    # The lines below will detect the next legal available drive letter and choose the next available letter 
    $letter = [char[]]”DEFGJKLMNOPQRTUVWXY” | ?{!(gdr $_ -ea ‘SilentlyContinue’)} | select -f 1
    $letter = $letter + “:”

    # This is where the script will collect all vhd files in the specified folder and compact them
    $Dir = get-childitem $Path -include *.vhd -name

    foreach ($name in $dir) {
    $vdiskpath = $path + “” + $name
    $script1 = “select vdisk file=`”$vdiskpath`”`r`nattach vdisk”
    $script2 = “select vdisk file=`”$vdiskpath`”`r`nselect part 1`”`r`nassign letter=$letter”
    $script3 = “select vdisk file=`”$vdiskpath`”`r`ndetach vdisk”
    $script4 = “select vdisk file=`”$vdiskpath`”`r`nattach vdisk readonly`”`r`ncompact vdisk”
    $script1 | diskpart
    start-sleep -s 5
    $script2 | diskpart
    cmd /c defrag $letter /U
    $script3 | diskpart
    $script4 | diskpart
    $script3 | diskpart
    }

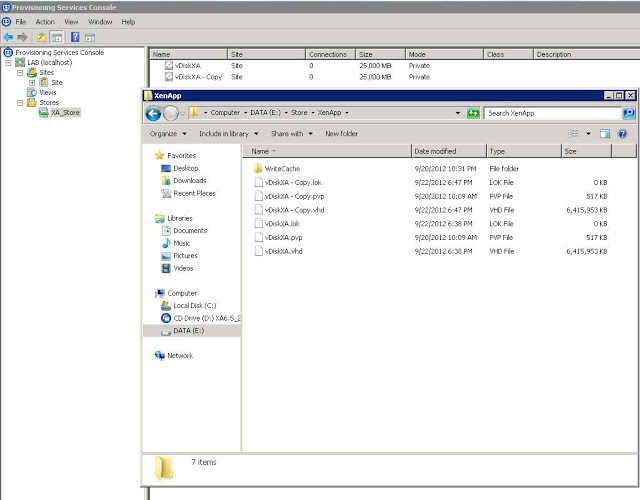
    In the screenshot you will see two VHD files located in a PVS store. Both are the same size on disk currently, one has had some files deleted by mounting the VHD manually and the space is not cleared from the VHD yet…

    The below screenshot is after the script is completed and the VHD has been compacted.

    Hope you enjoy and find this script useful, if you have suggestions, comments or issues or anything, leave me a comment below or find me on twitter at @P2Vme


  • Citrix Partners – Get Free GoTo Cloud Services for 1 year!

    Great way for Citrix to support their partners. Varrow is a Gold Solutions Advisor.

    Discover how Citrix can help you work with anyone from anywhere.
    Sign up to receive 1 FREE year of the following:

    • 5 GoToMeeting: Enable 5 people to host unlimited meetings with up to 25 attendees
    • 1 GoToWebinar: Host unlimited webinars with up to 100 attendees
    • 1 GoToTraining: Conduct unlimited training sessions with up to 20 attendees
    • 1 CitrixAssist: Provide support through a Citrix-branded portal, powered by GoToAssist Corporate
    • 5 GoToMyPC: Give 5 people the ability to remotely access 1 computer from anywhere

    And, we recently re-launched our Referral Partner Program so you can share your love Citrix products & earn commission!  All Silver, Gold and Platinum Citrix Solution Advisors, System Integrators, Independent Software Vendors and Citrix Authorized Distributors qualify.

    Read more and sign up here.


  • Home Lab – a great resource

    I have been looking at building a lab for quite some time, years actually.

    Well I finally pulled the trigger, which I couldn’t do without the support of my company Varrow and my wife. Check out Jason Nash’s blog post on “In Support of the Home Lab” on how Varrow really takes it to the next level for supporting home labs and I think other companies should step up and help their employees too as the lab is a win/win situation for all parties involved.

    Read more for details on equipment and some of the trials and tribulations I have gone through thus far.


    There are many blog posts from folks in the community on building a home lab and what equipment they chose. I will include some of those articles at the end to give you more ideas on what to use in your lab.

    Here is the equipment that I chose, all purchased from Newegg.

    Case LIAN LI PC-V351B Black Aluminum MicroATX Desktop Computer
    2
    $109.99
    $219.98
    Motherboard SUPERMICRO MBD-X9SCL-F-O LGA 1155 Intel C202 Micro ATX
    2
    $179.99
    $359.98
    Power Supply Rosewill Green Series RG630-S12 630W Continuous @40°C,80
    2
    $59.99
    $119.98
    CPU Intel Xeon E3-1220 Sandy Bridge 3.1GHz LGA 1155 80W
    2
    $209.99
    $419.98
    Memory Kingston 8GB 240-Pin DDR3 SDRAM DDR3 1333 ECC Unbuffered
    4
    $79.99
    $319.96
    SSD – Internal Crucial V4 CT032V4SSD2BAA 2.5″ 32GB SATA II MLC Internal
    2
    $49.99
    $99.98
    NAS Synology DS212 Diskless System DiskStation – Feature-rich 2-bay
    1
    $299.99
    $299.99
    Storage Seagate Barracuda ST3000DM001 3TB 7200 RPM SATA 6.0Gb/s
    2
    $149.99
    $299.98

    All total this configuration cost me $2139.83 which again I couldn’t do without my employers generous lab policies after all I have four boys to feed and a wife who I want to keep happy.

    Notes on why I chose each piece for my lab as I put a lot of thought and planning into it. I had limited space and certain things I wanted to do and a set budget I had to get mine done in. You could choose other parts and save some money as well.

    • Case  – Chose the case due to size mainly and aesthetics, had to pass Wife Acceptance Factor
    • Motherboard – I wanted the Integrated IPMI 2.0 with KVM and Dedicated LAN for remote management
    • Power Supply – The power supply was on sale and got solid reviews for being quiet improving the WAF (wife acceptance factor)
    • CPU – Processor supports VT-D and was the best deal for my money
    • Memory – Best price Unbuffered ECC RAM i could find *Motherboard Requires Unbuffered ECC
    • SSD Internal – Wanted to use the Swap to Host Cache aka Swap to SSD Features in vSphere 5
    • NAS – Synology – accept no substitute -AWESOME, feature packed cant be beat, supports iSCSI and NFS and more. See Jason Nash’s review on the Synology 212+.
      • Only Regret – Wish I bought the DS412+ it supports VAAI with latest code and holds more drives
    • Storage – Most capacity and speed for the price I could get

    Watch the sales on Newegg, they constantly have things going out. If you are smart shrewd and have time on your hands, you could easily cut the cost down significantly.

    On to the build process

    So everything arrived from Newegg and i was like a kid in a candy store. The wife graciously allowed me to begin putting the pieces together as she wanted the boxes to disappear. I had a few issues such as a dead hard drive, the wrong ram was sent but most of that is being taken care of. I do have to say its a pretty whisper quiet set up. Even in the same room, I can’t hear the equipment minus a Cisco Switch which I have…

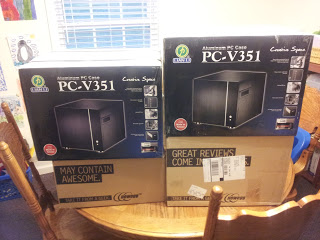
    The unboxed equipment waiting for me at home
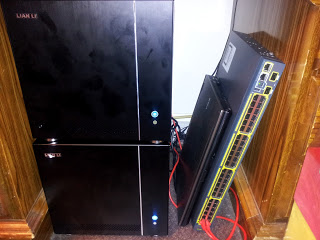
    The Final Product with glowing lights.
    A few of my trials and tribulations

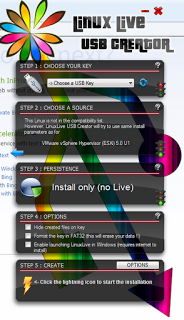
    I didn’t purchase a CD-Rom for the LAB so my plan was to install from a USB key. I found a nice utility (LinuxLive USB Creator) that you can use to create a bootable USB from any .iso file. I downloaded vSphere 5.0

    After I created my bootable USB with ESXi 5.0 Update 1 I thought I was in the clear and ready to begin installation. After I installed ESXi I ran into a bit of a snag, the NICs on my Host are not supported…

    I encountered this error “No compatible network adapter found. Please consult the product’s Hardware Compatibility Guide (HCG) for a list of supported adapters.

    There are two LAN controllers on the motherboard, neither are supported by ESXi 5.x

    • LAN Chipset
      Intel 82579LM
       
    • Second LAN Chipset
      Intel 82574L Duel NICs

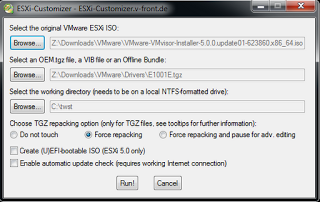
    After some searching and afraid I was going to have to spend more money or write my own driver (been a while) I found another enterprising soul had written a driver that should be compatible with my board. VMware has a KB article on how to installing ASYNC drivers on 5.x here but there is an app for that, the ESXi customizer. The drivers supported the Intel 82574L Chipset so I currently have two Gigabit NICs. The primary NIC is non functional. I will at some point buy additional NIC cards to support more ports.

    Driver Author’s Post 
    Driver Download
    ESXi Customizer

    Download the driver above and the ESXi Customizer. It will create a custom ISO in the working directory that you can then use the LinuxLive USB Creator above to create your bootable ISO that supports the motherboard NICs.

    So after all of this I now have two ESXi hosts built at home and I am working on building the vCenter, Domain controller and other VMs soon.

    My plan is to install and do nested hypervisors for testing and script development against multiple platforms. As I make progress I will be giving LAB updates here and new scripts to share with the community.

    Nested Xenserver
    http://www.vi-tips.com/2011/10/how-to-run-xenserver-60-on-vsphere-5.html

    Nested Hyper-V
    http://www.veeam.com/blog/nesting-hyper-v-with-vmware-workstation-8-and-esxi-5.html

    Software I plan on developing for and testing in my LAB in no particular order and by no means complete just what I am thinking off the top of my head.

    • Citrix XenApp Plat using Citrix PVS, Edgesight, Single Sign On, Smart Auditor
    • Citrix XenDesktop Plat using MCS and Citrix PVS
    • Citrix Netscaler Access Gateway
    • Citrix APP-DNA
    • Citrix VDI in a Box
    • VMware View
    • VMware vCloud Director
    • VMware Horizon Suite
    • Appsense
    • Veeam
    • Windows Server 2012
    • App-V
    • Thin Clients
    • Mobile Devices and management 
    • Certification Testing and Guides

    All in all I can’t recommend building a lab enough, I think in this business building a home lab whether it be virtual using the Autolab or building a full home lab with multiple hosts or even a single host is a requirement for any professional. Every time I build anything I learn something even if its just that the Aluminum case edges are sharp 🙂 I believe it is the best way to keep your skills sharp, test new products and test yourself against them.

    Home Lab Links by the community
    Jase McCarty
    Hersey Cartwright
    Jason Boche


  • Powershell XenApp Deployment Wizard v1

    Ever wanted an easier way to deploy XenApp machines en mass? Well have I got a treat for you.

    XenDesktop has an easy way to deploy virtual machines from Citrix Provisioning Server (PVS) but XenApp with PVS is missing this component making deploying virtual machines sometimes a very tedious task. I want to make that easier for myself, I mean the community :). I have began working on a script with another engineer and friend that should ease that pain. This script is only a v1 with future versions to support other hypervisors and remove some of the manual ad nauseum type work on large deployments.

    Currently the script is designed to do the following.

    Prerequisites:

    1. You will need to create two files currently placed in the root of C: (paths and files can be changed) 
      1. One file will contain a list of servers (servers.txt) and the other the list of ip addresses (ips.txt) Match up the lines in each file so the server and IP match up.
    2. You will need to run this script from the Provisioning Server
    3. Download and configure the Following Powershell Snap Ins
      1. XenServer Powershell Snap-IN
        1. Download XS-PS Windows installer
      2. Configure the PVS Powershell MCLI snap in
        1. The snapin comes with the Provisioning Services Console. To use the snapin, you have to first register it (requires .Net framework). If your Windows is 32bits, use this command: 
          1. “C:WindowsMicrosoft.NETFrameworkv2.0.50727installutil.exe” “C:Program FilesCitrixProvisioning Services ConsoleMcliPSSnapIn.dll” 
        2. For 64bits: “C:WindowsMicrosoft.NETFramework64v2.0.50727installutil.exe” “C:Program FilesCitrixProvisioning Services ConsoleMcliPSSnapIn.dll” 
        3. If you encountered error, make sure that you are running the Command Prompt as administrator. 
        4. Once registered, start a PowerShell console and add the snapin using “add-PSSnapIn mclipssnapin”. The main cmdlets are mcli-run, mcli-get, mcli-set and mcli-delete. To get a detailed help on the cmdlets, use mcli-help.

    Once you have completed the prerequisites you can run the script. The script is currently designed to do the following.

    1. Enter variables needed for script to run and confirm settings
    2. Create XenServer VMs based upon servers identified in c:servers.txt from template
    3. Create c:macs.txt listing all Mac addresses for each XenServer VM created from servers.txt
    4. Add IP MAC Reservations to primary Microsoft DHCP Server
    5. Add Devices to Citrix PVS server in appropriate collection and Site
    6. Export IP Mac Reservations from primary Microsoft DHCP server to Secondary DHCP server

    As this script is a v1 it is making a lot of assumptions and I plan on building more logic and support for various configurations into the script. If you have any ideas or suggestions, please leave me a comment or contact me.

    Upcoming Features

    • VMware Support

    ##########################################################################
    # XenApp PVS Deployment Wizard
    # This script is designed to help deploy XenApp machines en masse to a XenApp Farm using XenServer and Microsoft DHCP
    # XenApp_Wizard_v1.ps1 script written by Phillip Jones and David Ott
    # Version 1.0
    # This script is provided as-is, no warrenty is provided or implied.
    #
    # The author is NOT responsible for any damages or data loss that may occur
    # through the use of this script.  Always test, test, test before
    # rolling anything into a production environment.
    #
    # This script is free to use for both personal and business use, however,
    # it may not be sold or included as part of a package that is for sale.
    #
    # A Service Provider may include this script as part of their service
    # offering/best practices provided they only charge for their time
    # to implement and support.
    #
    # For distribution and updates go to: http://www.wwwp2vme.com
    ##########################################################################

    add-pssnapin xenserverpssnapin
    add-pssnapin mclipssnapin

    # Variables Section – This will define the variables that the script requires in order to create the VMs in DHCP, PVS and XenServer

    $sitename = Read-Host “Enter the PVS Site Name.”
    $collectionname = Read-Host “Enter the PVS collection name.”
    $xenserver = Read-Host “Enter the XenServer host name to connect to.”
    $XSBase = Read-Host “Enter the base VM to copy. (Case Sensitive!)”
    $SR = Read-Host “Enter the storage repository name. (Case Sensitive!)”
    $pdhcpip = Read-Host “Enter the IP address of the primary DHCP server.”
    $sdhcpip = Read-Host “Enter the IP address of the secondary DHCP server.”
    $pdhcpscope = Read-Host “Enter the DHCP scope (ie:10.xxx.xxx.0).”

    ” “
    “Please confirm before continuing.”
    ” “

    “PVS Site Name: “+$sitename
    “PVS Collection Name: “+$collectionname
    “XenServer: “+$xenserver
    “Base VM: “+$XSBase
    “Storage Repository: “+$SR
    “Primary DHCP IP: “+$pdhcpip
    “Secondary DHCP IP: “+$sdhcpip
    “DHCP Scope: “+$pdhcpscope

    $n = ([System.Management.Automation.Host.ChoiceDescription]”&No”)
    $n.helpmessage = “No, exit script”
    $Y = ([System.Management.Automation.Host.ChoiceDescription]”&Yes”)
    $y.helpmessage = “Yes, continue script”
    $YN= ($Y,$N)

    Function Prompt-YesNo ($Caption = “Confirm”, $Message = “Do you want to continue?”,$choices = $YN)
        {
            $host.ui.PromptForChoice($caption,$Message,[System.Management.Automation.Host.ChoiceDescription[]]$choices,1)
        }

    $answer = Prompt-YesNo
        if ($answer -eq 0) {“Continue”} else {Exit}
            Connect-XenServer -server $xenserver
            cmd /c if not exist c:csv md c:csv
        if (Test-Path c:macs.txt) {remove-item c:macs.txt}
            $vmnames = get-content c:servers.txt
            $ips = get-content c:ips.txt
            Remove-Item c:csv*.*

    # Xenserver – create VMs then pull MAC addresses for each and append c:MACs.txt

    foreach ($vmname in $vmnames)
        {
        Invoke-Xenserver:VM.Copy -VM $XSBase -NewName $vmname -SR $SR
            $vifs = Get-XenServer:VM.VIFs -VM $vmname
            $vmname | Out-File c:CSVVMs.csv -append -Encoding ASCII
            $vifs.mac | Out-File c:MACs.txt -append -Encoding ASCII
        }

    # MAC Translations – Required for DHCP and PVS as MAC formats are different for each program
    # PVS MAC MCLI input format
    Get-Content c:MACs.txt | ForEach-Object { $_ -replace “:”, “-” } | Set-Content c:csvMDevice.csv

    # DHCP MAC input format
    Get-Content c:MACs.txt | ForEach-Object { $_ -replace “:”, “” } | Set-Content c:csvMDHCP.csv

    # Obtain IP addresses from ips.txt file
    Get-Content c:ips.txt | Set-Content c:csvips.csv
        $num = 0
        $items = get-content c:csvvms.csv

    # DHCP and Citrix PVS
    foreach ($item in $items)
        {
            $server = get-content C:csvVMs.csv | Select-Object -Index $num
            $mdhcp = get-content C:csvMDHCP.csv | Select-Object -Index $num
            $ip = Get-Content C:csvips.csv | Select-Object -Index $num
            $mdevice = Get-Content C:csvMDevice.csv | Select-Object -Index $num
            “Dhcp Server \”+$pdhcpip+” Scope “+$pdhcpscope+” Add reservedip “+$ip+” “+$mdhcp+” “+”`”$server`””+” “+”`”`””+” “+”`”DHCP`”” | Out-File c:csvprimdhcp.txt -append -Encoding ASCII
            “Dhcp Server \”+$sdhcpip+” Scope “+$pdhcpscope+” Add reservedip “+$ip+” “+$mdhcp+” “+”`”$server`””+” “+”`”`””+” “+”`”DHCP`”” | Out-File c:csvsecdhcp.txt -append -Encoding ASCII
    # Citrix PVS add device to Site and Collection
            Mcli-Add Device -r siteName=$siteName, collectionName=$collectionName, deviceName=$server, deviceMac=$mdevice
            $num = $num + 1
        }

    “@Echo Off” | out-file c:csvdhcpimport.cmd -encoding ASCII

    #DHCP – This will export the settings of the DHCP reservations added above
    “netsh exec c:csvprimdhcp.txt” | out-file c:csvdhcpimport.cmd -append -encoding ASCII

    #DHCP – This will import the reservations on your secondary Microsoft DHCP server
    “netsh exec c:csvsecdhcp.txt” | out-file c:csvdhcpimport.cmd -append -encoding ASCII
    “echo Please verify all objects have been created successfully” | out-file C:csvdhcpimport.cmd -append -encoding ASCII
    “pause” | out-file C:csvdhcpimport.cmd -append -encoding ASCII
    Remove-Item c:csv*.csv
    cmd /c C:csvdhcpimport.cmd


  • Citrix Reciever for HTML5 1.0 Released

    Citrix announced on Friday Aug 31 that the HTML5 Reciever 1.0 was launched. This receiver will allow users to access desktops and applications provided by XenDesktop, XenApp, and AppController through HTML5-compatible Web browsers without needing to install Citrix clients on their devices.

    User Device Requirements
    • To use Receiver for HTML5, users require devices running the following Web browsers and operating systems. Users must not install Citrix Receiver or the Online Plug-in.

    Supported Browsers

    • Google Chrome 19
    • Mozilla Firefox 11

    Known Issues

    The following is a list of known issues in this release. Read it carefully before installing the product.

    SSL Relay support requires connections through Access Gateway
    Users cannot connect to applications provided by XenApp deployments that include the SSL Relay without using Access Gateway. To work around this issue, ensure that all users, including users on the local network, connect to the Receiver for Web site through Access Gateway. [#289816]

    Limitations 
    Receiver for HTML5 does not support client drive mapping. [#289827]

    When a user accesses a desktop or application through Receiver for HTML5, the resource starts in a new browser tab or window, according to the user’s browser settings. A floating toolbar containing controls for Receiver for HTML5 is displayed in the tab or window. The clipboard button enables users to copy and paste data between the local clipboard on the device and the resource running in the browser. Users can send the CTRL+ALT+DELETE key combination to their desktops and applications using the lock button.

    You can download the HTML5 receiver from Citrix here


  • Xenserver: Upcoming Feature Storage XenMotion

    Citrix announced on their blog a new upcoming feature in XenServer, Storage XenMotion (SXM). This is an extension to the existing XenMotion live VM migration feature, which allows VMs to be migrated between XenServer hosts in a resource pool. This feature is very similar to VMware’s SvMotion which is a good feature for those environments that wish to deploy XenServer.

    SXM extends this feature by removing the restriction that the VM can only migrate within its current resource pool. We now provide the option to live migrate a VM’s disks along with the VM itself: it is now possible to migrate a VM from one resource pool to another, or to migrate a VM whose disks are on local storage, or even to migrate a VM’s disks from one storage repository to another, all while the VM is running. 

    What can I do with this feature?

    With Storage XenMotion, system administrators now have the ability to upgrade storage arrays, without VM downtime, by migrating a VM’s disks from one array to another. This same operation can be used to provide customers with a tiered storage solution, allowing operators to charge customers different rates for the use of different classes of storage hardware, and then allow customers to upgrade or downgrade between classes with no VM downtime. SXM also supports multiple storage repository types, including Local Ext, Local LVM, NFS, iSCSI, and Fibre Channel, meaning that it is possible to move a VM’s disks between different storage repository types. It is even possible to convert a thick-provisioned disk into a thin-provisioned disk by migrating it to a thin-provisioning storage repository.

    Now that XenServer no longer restricts VM migrations to hosts in the same resource pool as the source host, it is much easier to rebalance VM workloads between different pools. This is especially useful in cloud environments, and our Cloud team is currently in the processes of integrating SXM with CloudStack and OpenStack open-source cloud orchestration frameworks.

    How does it work?

    Storage XenMotion works by moving a VM’s virtual disks prior to performing a traditional XenMotion migration. To support this, we have introduced a new internal operation: snapshot and mirror. Each of a VM’s disks are snapshotted, and from the point of the snapshot onwards, all of the disk’s writes are synchronously mirrored to the destination storage repository. In the background, the snapshotted disk is copied to the destination location. Once a snapshot has finished copying, the next disk to be migrated is snapshot/mirrored. This operation is repeated until all of the VM’s disks are in the process of being synchronously mirrored.

    If the VM is being migrated to a different resource pool, a new VM object is created in the destination pool’s database, and the migrating VM’s metadata is copied into this new object. This new VM’s metadata is then remapped so that it references the new disks that have been created on the destination storage repository, and so that the VM’s virtual NICs (VIFs) point to the correct networks on the destination. This network mapping is specified by the user. In the case of an in-pool Storage XenMotion, instead of creating a new VM object, the migrating VM’s metadata is remapped in-place.

    Once the VM metadata remapping is complete, the VM is ready to be migrated. At this point, the migration follows the same process as for the normal XenMotion operation. After the VM has migrated successfully, the VM metadata object on the source pool is deleted, and the leftover virtual disks, having been safely copied to their new location, are deleted from the source storage repository.

    Per the comments XSM has been completed in development and will ship with the next version of XenServer.


  • Shrinking VHD Files for Xenserver and Citrix PVS

    A question that often comes up when working with Dynamic vDisk when using Citrix Provisioning Server is does PVS automatically shrink the vDisk or is there a built in method to compact them. Citrix PVS does not have a way to do this automatically but with a few steps this can save some disk space on your storage.

    ** Update: 9/23 You can find the PowerShell script to Shrink VHD files here

    A good use case is lets say you clean up your images and remove old programs, installation files and things you no longer need, you will notice the file size does not go down. In order to maximize your storage investment, you want to keep these images as small as possible so you can do this on a regular basis.

    This method can also be used to shrink any VHD files which are used by Hyper-V, Citrix PVS, and you can even configure Windows 2008 and Windows 7 to use VHD files.

    Basic steps

    1. Make a copy of the VHD file that you have to compact 
    2. Open Server Manager
    3. Expand Storage
    4. Right-click on Disk Management on the server.
    5. Select Attach VHD.
    6. Select the required VHD File (The VHD appears as a volume on the server.)
    7. Defragment the drive for performance and storage optimization. (After defragmentation and optimization, the data on the VHD is now all at the beginning of the disk and defragmented.)
    8. Detach the VHD from within Disk Management. (Ensure that you do not delete the VHD when you are detaching the VHD.)
    9. Run the DISKPART command from a command Window.
    10. Run the following commands, substituting the path to your VHD file
      1. select vdisk file =”c:pathvdisk.vhd”
      2. attach vdisk readonly
      3. compact vdisk
      4. detach vdisk 
      5. exit

    Coming soon I will write a script that will execute against a folder and compact all VHD files in the folder. Keep an eye out here for that script 🙂 


  • Citrix Edgesight not uploading Error 1309

    Recently I have done several Citrix EdgeSight 5.4 implementations on Windows 2008 R2 and I have noticed a trend in large or busy environments where the Citrix Edgesight Agent cannot upload the performance data after Microsoft released a security update, MS11-100. It is a known issue but you will likely come across this on any new implementations as the default configuration will not work without additional changes.

    Citrix details the solution in CTX132116 I have also included the information below on how to resolve this issue.

    Microsoft security update MS11-100 limits the maximum number of form keys, files, and JSON members to 1000 in an HTTP request. Because of this change, ASP.NET applications reject requests that have more than 1000 of these elements. HTTP clients that make these kinds of requests will be denied, and an error message will appear in the web browser. The error message will usually have an HTTP 500 status code. This new limit can be configured on a per-application basis.

    Resolution.

    The following procedure is a customized version of that found in the Microsoft article:

    1. Open the %ProgramFiles(x86)%CitrixSystem MonitoringServerEdgeSightPages folder on the EdgeSight server.
    2. Create a copy of the web.config file and rename it web.config.pre-KB2661403.
    3. Open the web.config file in Notepad.
    4. Locate the section of text at the bottom of the file between the </location> and </configuration> tags.
    5. Add the following entries that are in boldface into the web.config file, as shown in the following code snippet:

      If the web.config file already contains the <appSettings> tag, then you have to insert the <add> tag under the existing <appSettings> tag.

      </system.web>
      </location>

      <appSettings>
      <add key=”aspnet:MaxHttpCollectionKeys” value=”10000″ />
      </appSettings>

      </configuration>

      Note: A value of 10000 is used in the example above. Current testing has proved that a value between 5000 and 10000 is typical to accommodate most daily payload uploads. Note that this value is environment dependent. A higher value might be required or a lower value might be sufficient. Citrix recommends testing a value and increase or decrease the value as required until a minimum threshold is identified. Customers should monitor if the symptoms recur with larger payloads and adjust the key value as required. Additionally, a significantly higher value, such as a value between 50000 to 80000, might be required for the first 24 hours until backlogged payload data is uploaded. Later, the key value can be decreased.

    6. Save the file and close the text editor.
    7. Restart IIS.